


Table of contents
This article was first published on blogs.oracle.com in September of 2019. Not long after it was published I was made aware of a couple of security flaws. However by that time the underlying blogging platform Oracle was using had been migrated and I lost access to make the required changes. This resulted in the article being removed.
I've rewritten the article here on my personal blog. The main text of the article is the same, but with the few small security flaws fixed. I know that many people found this walkthrough useful in the past, so I hope republishing this will help others.
Its pretty well known in the APEX world that built-in security comes in two main flavors: Authentication (can I get in to the app at all) and Authorization (what am I able to do once I am allowed in). And, while there has been a lot written around various custom and built-in Authentication Schemes, I haven't seen much written about Authorization and even less about making use of APEX's built in Access Control functionality. So after a recent visit to a customer who had that very question, I decided to write a "How To" on the topic. Hold on to your seat - this is likely to be a long and winding road. Don't worry though, there's lots of pictures!
Overview
APEX does a great job of providing an awful lot for free, and that goes a long way provided that you stay within the framework for which each component was intended. But what if your case is special? (Isn't everyones?). The customer I met with is building a system that will be available to potentially anyone, so they want to build a custom authentication scheme where they can maintain users and their attributes. Their system will be open to individuals as well as organizations so, depending on their role, individual users may have very different authorities in the system.
Though this example is going to be significantly simplified from what my client is likely to implement, what I'm going to attempt to do is show all the working parts and how they fit together to create a working security model. Namely:
A simple custom authentication scheme.
A discussion on using the Application Access Control shared components.
Creating the required shared components from scratch.
Creating a set of example Access Control Tiers.
Creating Exclusive and Cascading Authorization Schemes that reference those tiers.
Creating a list of values to use to assign Roles to Users in the system.
Creating the page to test it all out.
Form to apply Roles to a user.
Using the APEX built-in API's used to assign and remove roles to and from users.
Applying the Authorization Schemes to APEX components to test your work.
Custom Authentication
As I mentioned, there are various blog posts out there on Authentication. But I don't want to send you scurrying around the web scrubbing through multiple posts, so I'll post the code for a simple custom authentication scheme here.
Caveat Emptor! This authentication scheme is very basic and is really here for demo purposes only. It's not really meant for use in a production system. You'd likely want something far more robust such as a Single Sign On, Social Sign-on or SAML-based Authentication scheme. For more information about the vulnerabilities, please see the comments section at the end of this article.
With that caveat out of the way, lets dig in ...
The Database Objects
First we start with a function called HASH_PASSWORD. This function receives two inputs (p_user_name and p_password) and uses the Username and Password to produce a unidirectional hash that can be saved to the database.
------------------------------------------------------------------------
-- FUNCTION: H A S H _ P A S S W O R D
------------------------------------------------------------------------

CREATE OR REPLACE FUNCTION HASH_PASSWORD
  (p_user_name in varchar2,
   p_password  in varchar2)
return varchar2
is
  l_user          users.user_name%type := upper(p_user_name);
  l_password varchar2(255);
begin
    --
    -- The following encrypts the provided password and returns the encrypted string.
    -- This is a one-way encryption using SHA512
    --
    select standard_hash(p_user_name||p_password, 'SHA512')
        into l_password
        from dual;

    return l_password;
end hash_password;
/
Next is the actual USERS table. This version is very simple, holding only a unique key for a user, their user name and their password. Notice that we are making sure that the username is unique so we don't have any clashes. Also notice that in the Before Update and Before Insert trigger we're hashing the password using the HASH_PASSWORD function. This makes sure we never store the password in clear text.
------------------------------------------------------------------------
-- TABLE: U S E R S
------------------------------------------------------------------------
CREATE SEQUENCE "USERS_SEQ"
  MINVALUE 1 MAXVALUE 999999999999999999999999999
  INCREMENT BY 1 START WITH 1
  NOCACHE NOORDER NOCYCLE NOKEEP NOSCALE GLOBAL
/
CREATE TABLE  "USERS"
( "USER_ID"   number,
  "USER_NAME" varchar2(255) NOT NULL ENABLE,
  "PASSWORD"  varchar2(255) NOT NULL ENABLE,
  PRIMARY KEY ("USER_ID") USING INDEX  ENABLE,
  CONSTRAINT "USERS_U1" UNIQUE ("USER_NAME") USING INDEX  ENABLE
)
/

CREATE OR REPLACE EDITIONABLE TRIGGER  "BI_USERS"
  before insert on users
  for each row
begin
  -- Get a unique sequence value to use as the primary key
  select users_seq.nextval into :new.user_id from dual;
  -- Make sure to save the username in upper case
  :new.user_name := upper(:new.user_name);
  -- Hash the password so we are not saving clear text
  :new.password := hash_password(upper(:new.user_name), :new.password);
end;

/
ALTER TRIGGER  "BI_USERS" ENABLE
/

CREATE OR REPLACE EDITIONABLE TRIGGER  "BU_USERS"
  before update on users
  for each row
begin
  -- Make sure to save the user name in upper case
  :new.user_name := upper(:new.user_name);
  -- If the new password is not null
  if :new.password is not null then
    -- Make sure to hash the password so it is not stored in clear text
    :new.password := hash_password(:new.user_name, :new.password);
  -- If the password is empty
  else
    -- Keep the old hashed password. We don't want a blank password.
    :new.password := :old.password;
  end if;
end;

/
ALTER TRIGGER  "BU_USERS" ENABLE
/
Finally we have the AUTHENTICATE_USER function that will form the basis of our Custom Authentication scheme. The function first checks to see if the user exists, then hashes the password provided and then compares the new hash to the hash that we have stored in the database. If anything goes wrong, we reject the user and log the results.
create or replace FUNCTION AUTHENTICATE_USER
  (p_username in varchar2,
   p_password in varchar2)
return boolean
is
  l_user_name       users.user_name%type    := upper(p_username);
  l_password        users.password%type;
  l_hashed_password varchar2(1000);
  l_count           number;
begin
-- Codes I normally use for AUTHENTICATION_RESULTS
-- These get logged to the APEX Login Access Log.
--
--    0    Normal, successful authentication
--    1    Unknown User Name
--    2    Account Locked
--    3    Account Expired
--    4    Incorrect Password
--    5    Password First Use
--    6    Maximum Login Attempts Exceeded
--    7    Unknown Internal Error
--
-- First, check to see if the user exists
    select count(*) into l_count from users
      where user_name = l_user_name;

     if l_count > 0 then
          -- Hash the password provided
          l_hashed_password := hash_password(l_user_name, p_password);

          -- Get the stored password
          select password into l_password from users where user_name = l_user_name;

          -- Compare the two, and if there is a match, return TRUE
          if l_hashed_password = l_password then
              -- Good result.
              APEX_UTIL.SET_AUTHENTICATION_RESULT(0);
              return true;
          else
              -- Incorrect Password
              APEX_UTIL.SET_AUTHENTICATION_RESULT(4);
              return false;
          end if;

    else
          -- The username does not exist
          APEX_UTIL.SET_AUTHENTICATION_RESULT(1);
          return false;
    end if;
    --
    return true;
exception
    when others then
        -- We don't know what happened so log an unknown internal error
        APEX_UTIL.SET_AUTHENTICATION_RESULT(7);
        APEX_UTIL.SET_CUSTOM_AUTH_STATUS(SQLERRM);
        return false;

end authenticate_user;
/
And since we'll need a user to test with, let's create an ADMIN user. Since the above triggers are in place, the password will be hashed and stored in an encrypted state.
Insert into USERS (USER_ID,USER_NAME,PASSWORD) values (1,'ADMIN','admin')
/
Applying the Authentication Scheme
APEX provides you with a number of built-in Authentication Scheme types, including Application Express Accounts, Database Accounts, LDAP Directory, Social Sign-in, and others. However, as we've discussed, there are times when you're going to want to roll your own. In this case you'll want to use the Custom Authentication Scheme type.
Creating a simple custom theme based on our AUTHENTICATE_USER function and the underlying tables is actually pretty easy. Simply navigate to the shared components of your application, click on the Authentication Schemes link under Security and click Create >. At this point a wizard will walk you through the required steps.
Your first choice will be whether you copy an existing scheme, or create a new one based on one from the gallery. In our case we're using the gallery, so clicking Next > will take us to a list of available schemes.
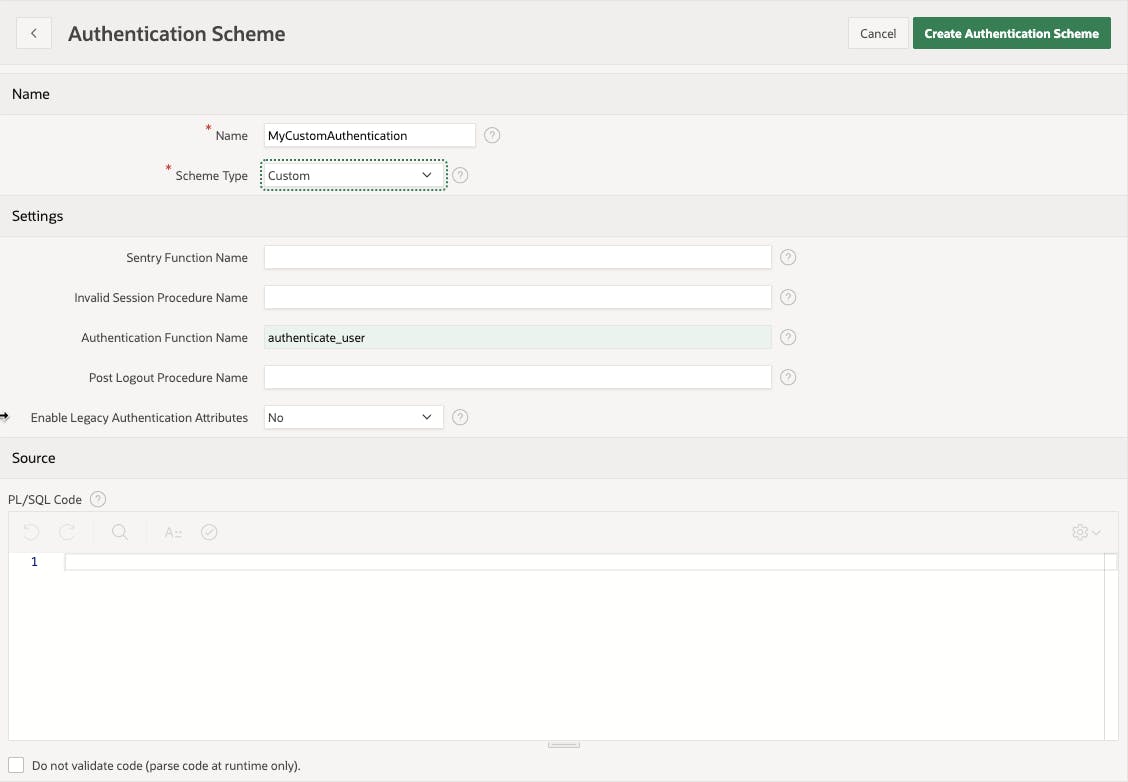
At this point you give your new Authentication Scheme a name (something like MyCustomAuthentication) and choose the scheme type (custom). The moment that you choose Custom as the type, you're presented with a number of fields to fill in. Don't get freaked out... You really only have to fill in one - the Authentication Function Name. In that field simply type authenticate_user and click Create Authentication Scheme.
Note: APEX assumes that the function you indicate for your Authentication Function takes in two parameters (P_USERNAME and P_PASSWORD) and returns a boolean that indicates whether the user has been successfully authenticated. That's why you only need to provide the function name.
After creating the new Authentication Scheme, APEX automatically sets it as the default for the application. At this point you are no longer logging in to your application using your APEX user, but instead using the entries in your USERS table. Seeing as we only created one user (admin/admin) you should only be able to log in using that.
Access Control Overview
I know its taken us a while to get here, but this is the real meat of this post. Here is where you learn that the Access Control components are more powerful than they have been given credit for.
The Ability to have APEX create access control components for you has been around for quite a while, but starting with version 18.1 they got a face lift and became a more integral part of the wizards.
Reading the APEX Builder's Guide description of the Access Control feature, we learn that:
"[This feature] Incorporate[s] role-based user authentication within your application. Users can be defined as Administrators, Contributors, or Readers. You can then readily define different access to different roles for various components throughout your application, such as pages, menu entries, regions, columns, items, buttons and so forth."
So the wizard will create a number of pages to manage things such as User to Role Assignment and whether Access Control is even enforced, as well as some sample roles and authorization schemes. But it actually creates quite a few things under the covers. Let's unpack what it actually does.
When the wizard completes and you check the results you see that it creates:
1 Application Setting (ACCESS_CONTROL_SCOPE) - Used to dictate whether Access control is enabled or not.
1 Build Option (Feature: Access Control) - Not used unless you also choose to install the Configuration Options feature.
3 Roles in Application Access Control (Administrator, Contributor, Reader) - Roles used to exemplify a simple segregation of duties.
1 User to Role Mapping - By default, when you create the feature, APEX maps your current APEX user to the Administrator role.
3 Authorization Schemes (Administrator Rights, Contributor Rights, Reader Rights) - These authorization schemes are based on the roles created in Application Access Control and can be used to lock down APEX components.
2 List of Values (ACCESS_ROLES, EMAIL_USERNAME_FORMAT) - The first is a dynamic LOV that lists all of the current roles defined as part of Application Access Control. The second is a simple LOV used on one of the forms used to create multiple users.
6 Pages and their associated Menu, Breadcrumb entries - An overall Administration page, a page to configure Access Control, A report and form to maintain individual users, and a 2 step wizard to add multiple users.
Actually, that's quite a lot that the wizard does for you, and as an example, its very useful. However, out of the box, the feature isn't without its challenges. For instance, there is no hard link between the usernames you assign roles to and the users that are actually defined in the system. Meaning you could just make up a user that doesn't exist and assign a role to it. And while the default roles (and authorization schemes) are great examples, most systems are more complicated than that, requiring more granular roles and varying level of authority.
Building Out Our Own Solution
I know it's very tempting to create the Access Control Feature using the wizard and then go in to its component parts and fix the things that don't fit your model, and that would be quite legitimate, but for this post we're going to abandon what the wizard gives us and create what we need (and only what we need) from scratch so we understand how they all link together.
Creating the Shared Components
Application Access Control Roles
The first thing you'll need to do is understand what authorization levels will need to be implemented in your application because this will define not only the roles you create in the Application Access Control shared component, but will also guide what Authorization Schemes you define and are able to apply to the various APEX components.
Most applications will have a static set of authorization levels. Although the example in this blog post is extremely simplified, as a basis this solution should work well for those circumstances.
If you are in a situation where you are required to use a third party system to dictate authorization levels, or you for some reason need to implement dynamic levels, then your job becomes much more complicated and is far outside of the scope of this post.
For our example we're going to use 4 different authorization tiers.
1-Administrator
2-Manager
3-User
4-Consumer
Although not much more complex than what APEX gives you by default, it gives us enough levels to see how we can create both Exclusive and Cascading authorization schemes.
To create these 4 roles in our sample application, we navigate to Shared Components > Application Access Control. From there use the Add Role > button to add the for roles above. You'll end up with something like this:
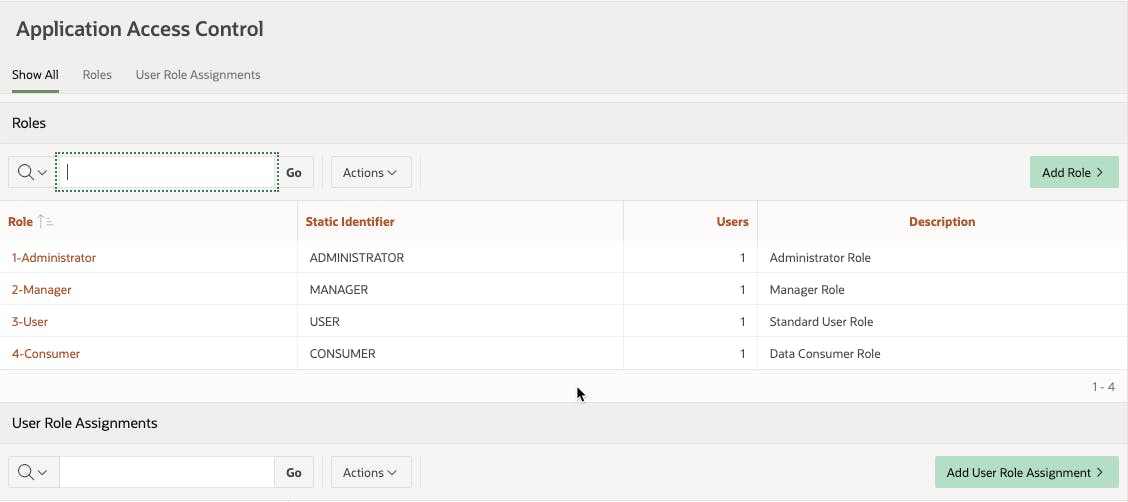
At this point we're not going to enter any User Role Assignments as we want to make sure we do that through the app we're building and that we only deal with users that actually exist in our USERS table. We'll get to that a little later.
Authorization Schemes
By themselves, the Access Control Roles don't, in essence, do anything but provide the ability to link a user to a role. It's the related Authorization Schemes that provide the logic that allow you to tie a Role to a given Component in APEX. Discussing how to properly implement Authorization schemes can be a rabbit hole, but in the interest of keeping things as simple as possible, we're going to rely on as much built in functionality as we can for our example.
Just know that you could write detailed and complex PL/SQL logic that checks all sorts of things including time of day, validity of the user's account, Application Status, and a dozen other things to decide whether the current user is really authorized to do the thing they're trying to do.
For our example we're going to create two separate Authorization sets:
Exclusive Authorization - Whereby the user that is assigned a role has access to only the rights assigned to that role.
Cascading Authorization - Whereby the user that is assigned a role has access to all the rights of the role they are assigned and the rights of those lower in the hierarchy.
First let's attack the Exclusive Set. If you navigate to your application's shared components and then to Authorization Schemes, you may see that one called "Administration Rights" already exists. This is a default Authorization scheme that is created for the app that always returns TRUE. For our purposes, you can ignore it. But if it bothers you, you can delete it. We won't be needing it.
To create the Exclusive Authorization Schemes that we need we can click on the Create > button and follow the wizard. We'll be creating all of these From Scratch so simply take the defaults on the first page of the wizard and move on.
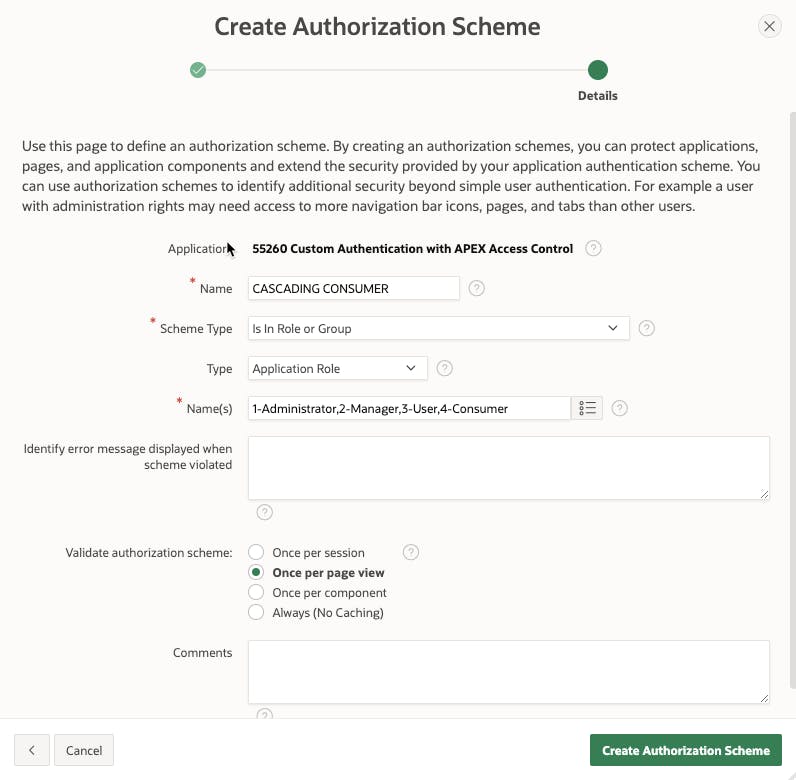
On the next page, enter the details of the Authorization scheme as shown in the following screenshot.
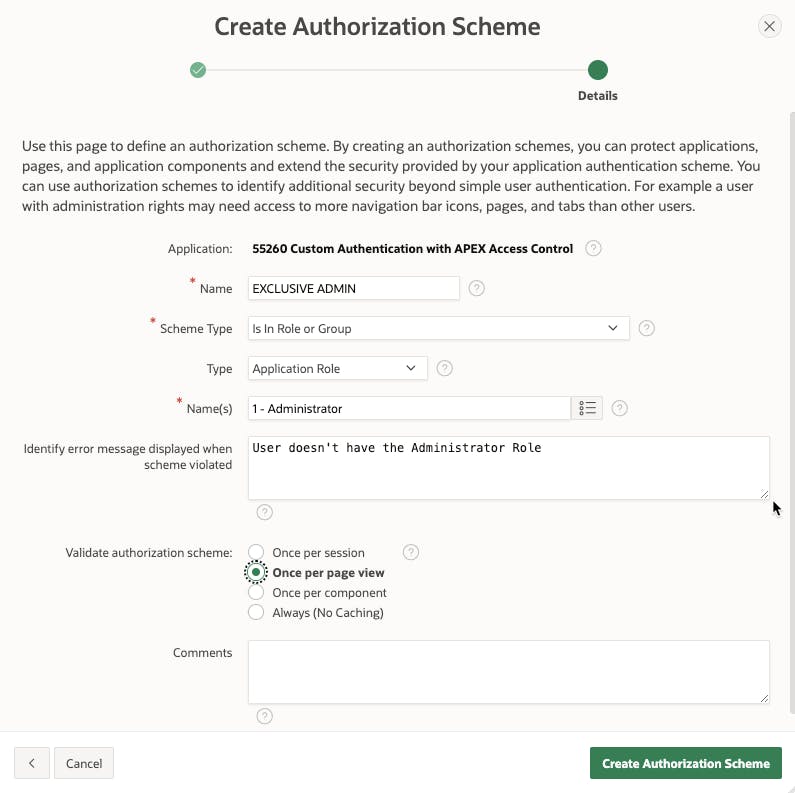
Going over the individual fields:
Name - Unique name for the Authorization Scheme. This should be descriptive enough that when you go to apply it to an APEX item, you know what you're getting.
Scheme Type - Although there are lots of types here, we're going to stick with
Is in Role or Group.Type - This further classifies the Scheme Type and here we'll choose to use the Application Role types that we have already defined.
Name(s) - This allows you to select one or more Application Role to check for this Authorization scheme. For the purposes of this Exclusive scheme, we're only going to choose 1 role.
Error Message - What error message do you want to display if the scheme is violated. For example, someone tries to perform an action that is tied to a role that they're not a part of.
Validate - This dictates how often to validate the Authorization Scheme. In the real world the choice here depends on how restrictive you want your Authorization to be, how much logic may be built into the scheme itself, and how frequently the result may change. For our purposes we're choosing once per page view because we'll want to see any changes we apply without having to log out and back in.
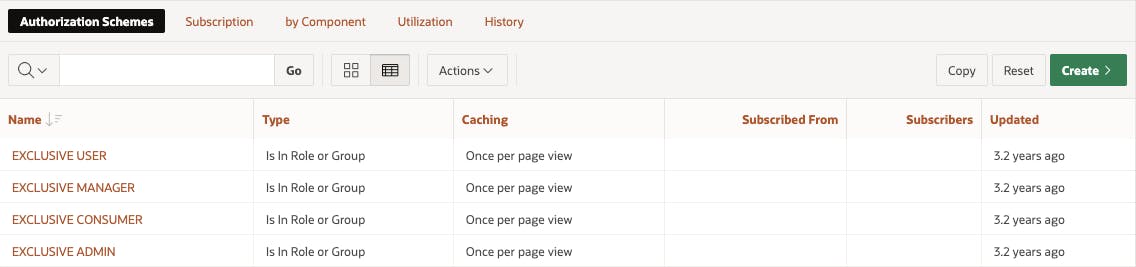
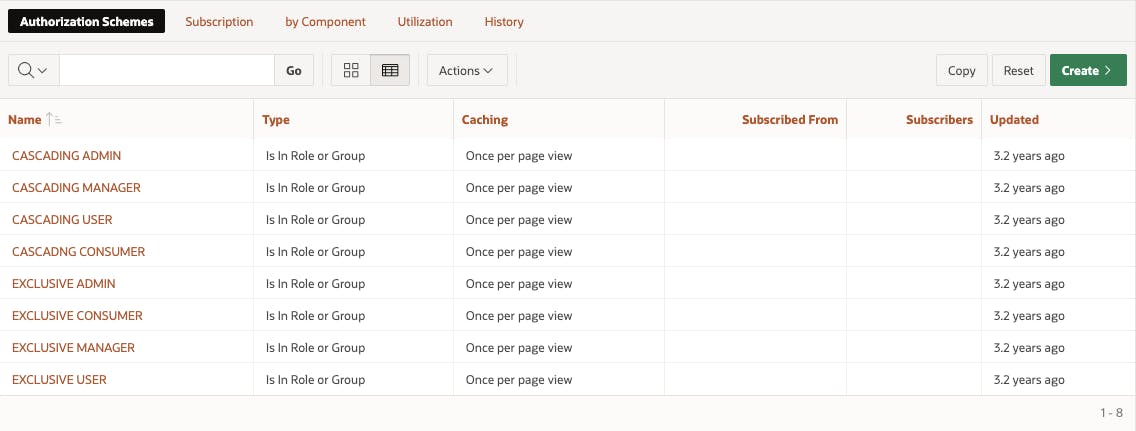
If we continue to create 3 more Exclusive Authorization Schemes (one each for the Application Roles we have left) following the guidelines above, you end up with a list that looks like this:
Now that we have our Exclusive Authentication Schemes let's see how to create a set of Cascading Schemes. We use the same wizard and most of the same attributes, but one major thing will change; The list of names for the Application Roles we assign to each scheme. Here's the first one for Cascading Consumer scheme:
Notice in the Name(s) field we have a comma separated list of roles. The list of roles indicates that anyone who is assigned one of the listed roles may see the protected component. As you work your way up the ladder, the CASCADING USER Authorization Scheme would exclude the Consumer role, the CASCADING MANAGER would exclude the Consumer and User roles, etc. finally ending up with the CASCADING ADMIN Authorization Scheme that only references the Administrator role.
In the end you should have 8 Authorization schemes; 4 Exclusive and 4 Cascading.
Roles List of Values
The last shared component we need is a simple list of values that presents the Application Access Control roles so that we can use them in our User Interface. There is nothing particularly special about this LOV other than the fact that it uses the APEX view APEX_APPL_ACL_ROLES. To create it, simply create a dynamic List of Values called ACCESS_ROLES using the following query.
select role_name d, role_id r
from APEX_APPL_ACL_ROLES
where application_id = :APP_ID
order by 1
Creating a UI
Now that we have all the back end components we need, we can create a UI that allows us to test it all out. For the purposes of demonstration I'm going to do everything on one page.
Applying Roles to our Admin User
The first thing we'll do is create an extremely simple form on the page to allow us to apply and remove roles from the admin user. To do this create a Static Content region named Apply Roles and in it, place a Check Box item called P1_ROLE_IDS. In the attributes of the check box, set the List of Values to the ACCESS_ROLES LOV we created earlier. We also need a button to save our changes, so add a button to the region and call it SUBMIT.
You should end up with a form that looks something like this:

Now we need to add in the logic to read and display the currently assigned roles, and save any changes we may apply.
To read the currently assigned roles and display them using the P1_ROLE_IDS item, we need to create a new APEX Process in the Pre-Rendering > Before Header execution point of the page. This region should contain the following code:
declare
    l_roles     varchar2(4000);
begin
    select role_ids
      into l_roles
      from apex_appl_acl_users
     where APPLICATION_ID = :APP_ID
       and USER_NAME = 'ADMIN';
       --
     :P1_ROLE_IDS := l_roles;
exception
    when no_data_found then
        :P1_ROLE_IDS := '';
end;
To save any changes we need to create a process in the Processing execution point and link it to the SUBMIT button. Create a process called Assign Roles to User, and use the following PL/SQL code for its action. Don't forget to set the Success Message and the When Button Pressed attribute the SUBMIT.
declare
    l_roles   wwv_flow_t_number := apex_string.split_numbers(:P1_ROLE_IDS, ':');
BEGIN
    APEX_ACL.REPLACE_USER_ROLES (
        p_application_id => :APP_ID,
        p_user_name => 'ADMIN',
        p_role_ids => l_roles );
END;
Notice that this process uses the APEX_ACL API. In this case we're using the REPLACE_USER_ROLES procedure to overwrite any roles that may already exist for the user, but you could just as easily use the API to individually add and remove roles.
Note: In the two code blocks above we've hardcoded the ADMIN user as the one we're assigning roles to. In the real world we'd have a form that allowed us to create and modify users and reference the user currently being edited instead of the hardcoded ADMIN user. In a system where people may be signing up for access, you may want to have a process whereby any new user is auto-assigned a default role (say, CONTRIBUTOR) and only given a more privileged role once vetted. There are loads of things you can do, and once you've chosen to create your own Authentication and Authorization schemes, you're in complete control of all of them.
The last step is to create a set of components to which we can assign our Authorization schemes and see how they work. For this application I created two empty Static Content regions named Exclusive Items and Cascading Items and placed them side by side in the page. I then created 4 more Static content regions in each side, set their template to Hero and chose an icon for each. I gave each of them name that would relate to the Authorization Scheme that I then assigned to them. See the image below.
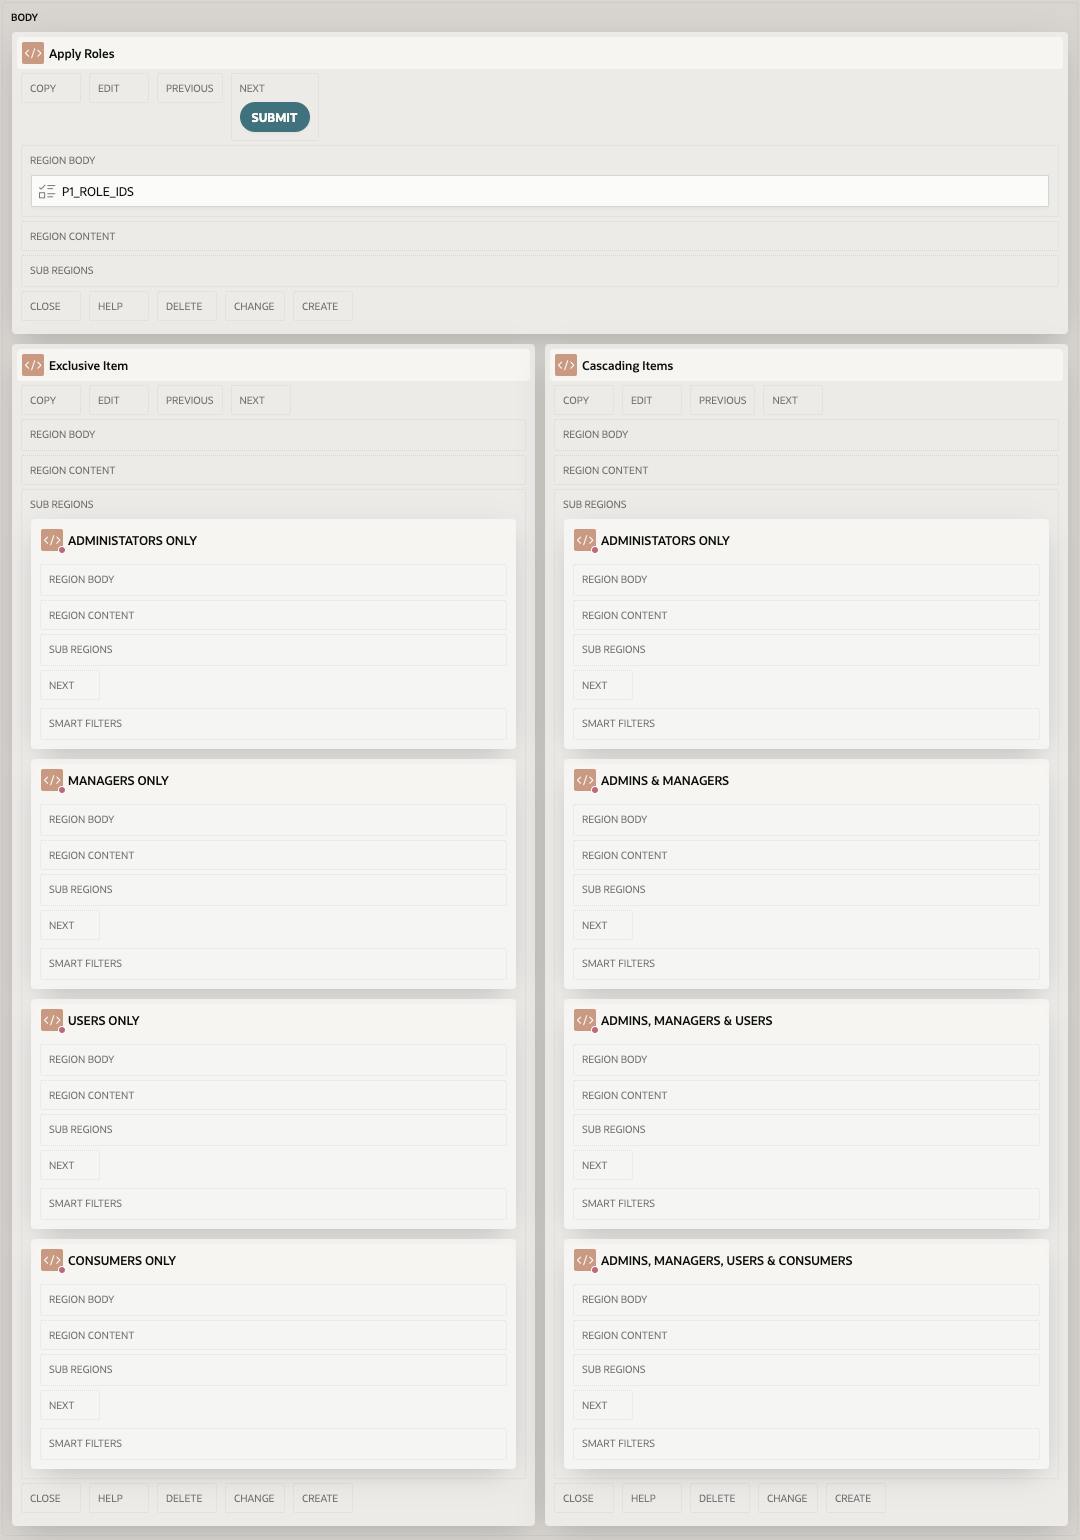
For each of the Hero regions on the left side, in the Security attributes section I assigned the EXCLUSIVE Authorization scheme that matched the name of the region (EXCLUSIVE ADMIN for ADMINISTRATORS ONLY, EXCLUSIVE MANAGER for MANAGERS ONLY and so on). Once they are applied, the region will only be rendered if you have assigned the related role to the admin user using the form.
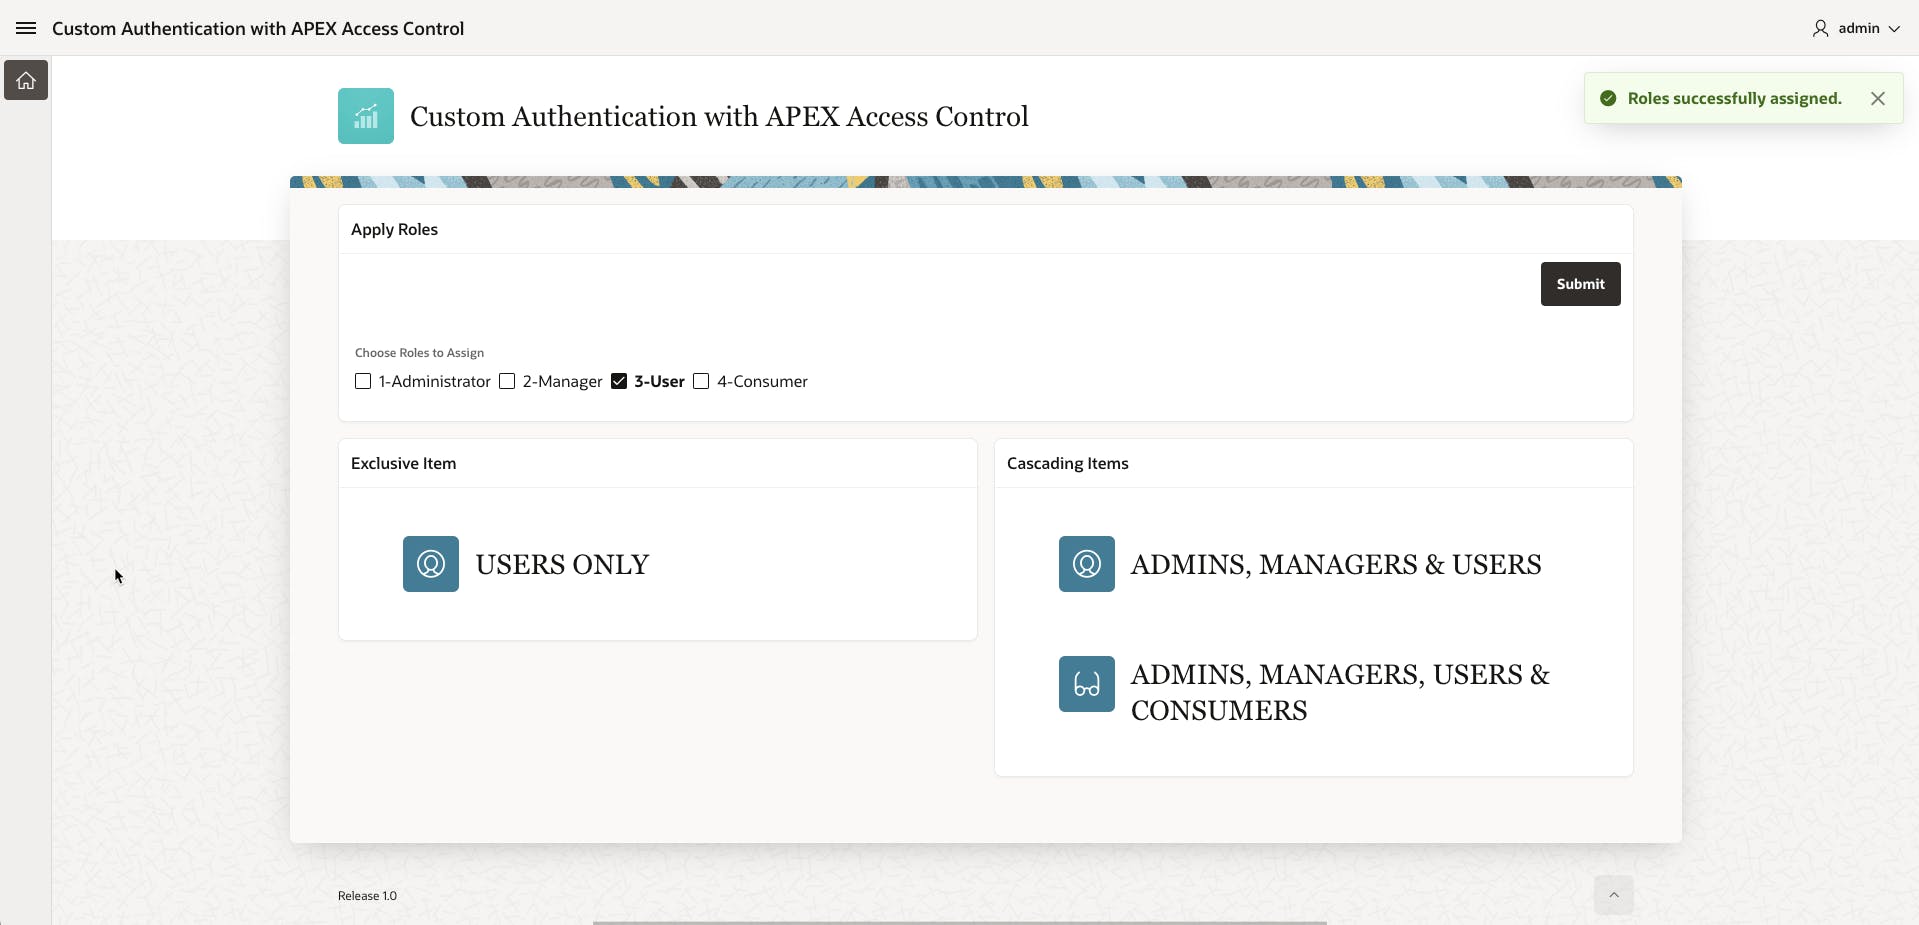
Similarly, on the right side, I assigned the matching CASCADING role to each of the Hero regions. Once applied you will see that if you apply any role to the admin user, the regions for that role and any cascaded role will be rendered. An example below shows the User role being applied. Notice that in the EXCLUSIVE section, you only see the USER protected region, but on the CASCADING side, you see both USER and CONSUMER due to the cascading nature of the USER Authorization Scheme.
Summary
In this post we've explored the components of Access Control and how to use them to implement a custom Authorization Scheme using the built in components. There is obviously a lot more you could do to extend and demonstrate authorization techniques, but this post is longer than even I thought it would be.
You can try out the application here on apex.oracle.com. Simply log in with admin/admin and play around with assigning roles. if you want to pick apart what I've done, you can also download the full application here.
Thanks for putting up with the extremely long post and, as always, if you have questions I'm happy to try to help. But this should give you the building blocks that you need to take this to the next level.